| PyTorch 源码解读之 torch.cuda.amp: 自动混合精度详解 | 您所在的位置:网站首页 › pytorch 分布式计算 › PyTorch 源码解读之 torch.cuda.amp: 自动混合精度详解 |
PyTorch 源码解读之 torch.cuda.amp: 自动混合精度详解
|
插播一条小消息:开年福利!OpenMMLab 全新企划,等你来 礼品福利等你来~ 文@202011 Nvidia 在 Volta 架构中引入 Tensor Core 单元,来支持 FP32 和 FP16 混合精度计算。也在 2018 年提出一个 PyTorch 拓展 apex,来支持模型参数自动混合精度训练。自动混合精度(Automatic Mixed Precision, AMP)训练,是在训练一个数值精度 FP32 的模型,一部分算子的操作时,数值精度为 FP16,其余算子的操作精度是 FP32,而具体哪些算子用 FP16,哪些用 FP32,不需要用户关心,amp 自动给它们都安排好了。这样在不改变模型、不降低模型训练精度的前提下,可以缩短训练时间,降低存储需求,因而能支持更多的 batch size、更大模型和尺寸更大的输入进行训练。PyTorch 从 1.6 以后(在此之前 OpenMMLab 已经支持混合精度训练,即 Fp16OptimizerHook),开始原生支持 amp,即torch.cuda.amp module。2020 ECCV,英伟达官方做了一个 tutorial 推广 amp。从官方各种文档网页 claim 的结果来看,amp 在分类、检测、图像生成、3D CNNs、LSTM,以及 NLP 中机器翻译、语义识别等应用中,都在没有降低模型训练精度都前提下,加速了模型的训练速度。 本文是对torch.cuda.amp工作机制,和 module 中接口使用方法介绍,以及在算法角度上对 amp 不掉点原因进行分析,最后补充一点对 amp 存储消耗的解释。 1. 混合精度训练机制torch.cuda.amp 给用户提供了较为方便的混合精度训练机制,“方便”体现在两个方面: 用户不需要手动对模型参数 dtype 转换,amp 会自动为算子选择合适的数值精度对于反向传播的时候,FP16 的梯度数值溢出的问题,amp 提供了梯度 scaling 操作,而且在优化器更新参数前,会自动对梯度 unscaling,所以,对用于模型优化的超参数不会有任何影响以上两点,分别是通过使用amp.autocast和amp.GradScaler来实现的。 autocast可以作为 Python 上下文管理器和装饰器来使用,用来指定脚本中某个区域、或者某些函数,按照自动混合精度来运行。混合精度在操作的时候,是先将 FP32 的模型的参数拷贝一份,拷贝的参数转换成 FP16,而 amp 规定了的 FP16 的算子(例如卷积、全连接),对 FP16 的数值进行操作;FP32 的算子(例如涉及 reduction 的算子,BatchNormalize,softmax...),输入和输出是 FP16,计算的精度是 FP32。在反向传播时,依然是混合精度计算,得到数值精度为 FP16 的梯度。最后,由于 GPU 中的 Tensor Core 天然支持 FP16 乘积的结果与 FP32 的累加(Tensor Core math),优化器的操作是利用 FP16 的梯度对 FP32 的参数进行更新。 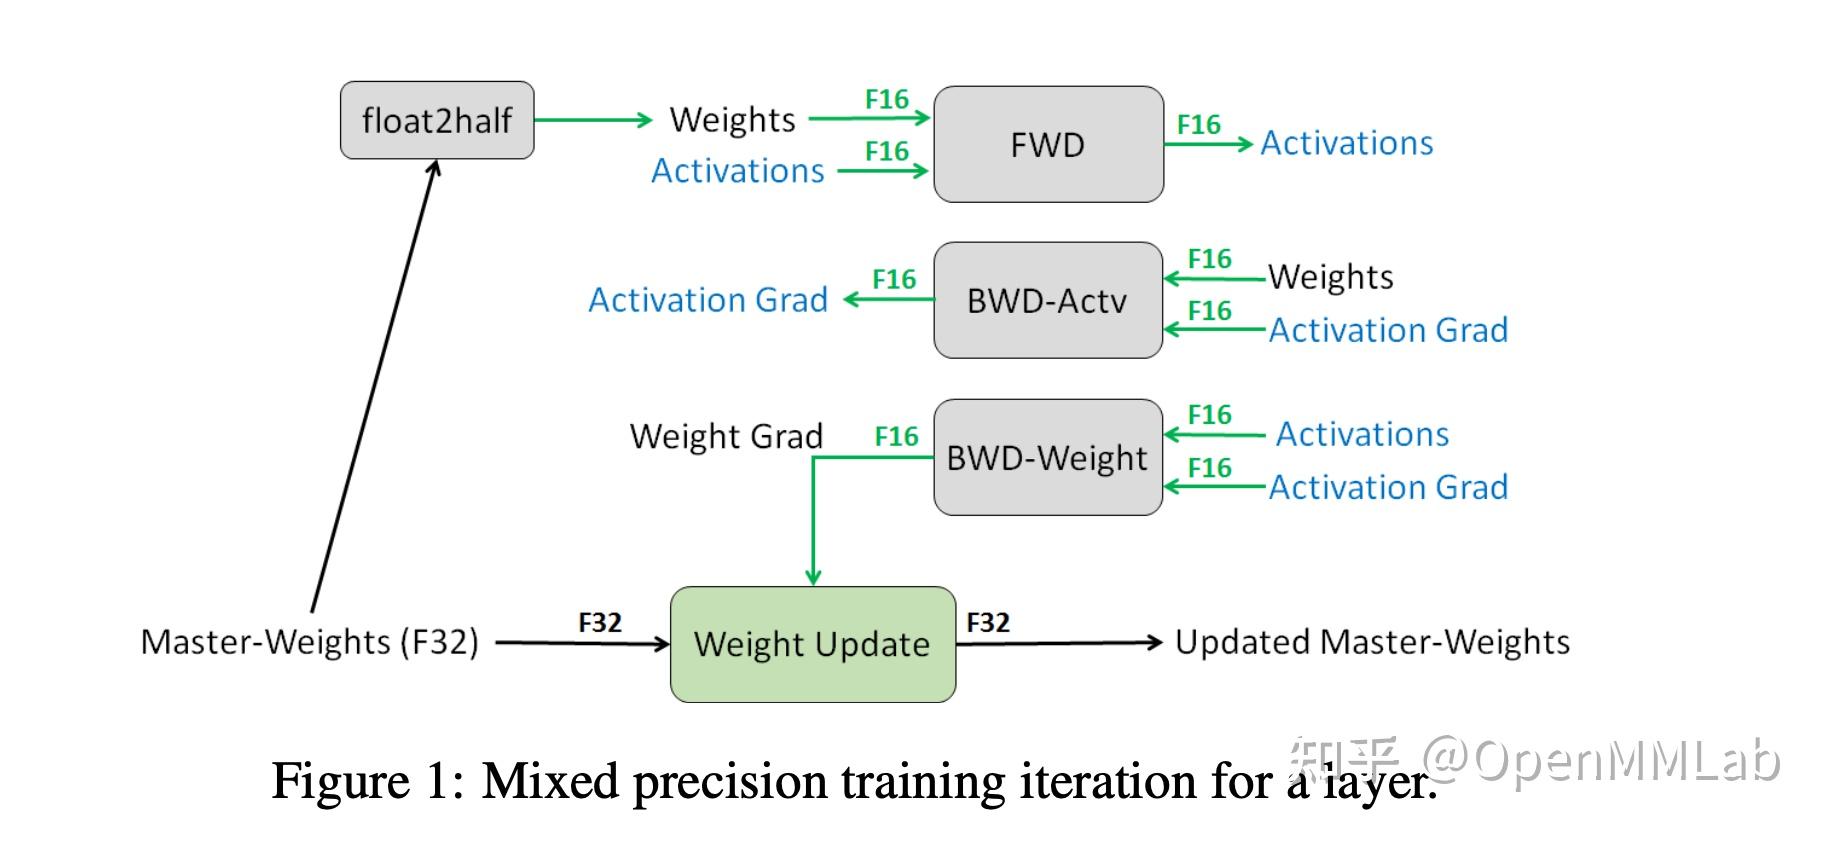 对于 FP16 不可避免的问题就是:表示的范围较窄,如下图所示,大量非 0 梯度会遇到溢出问题。解决办法是:对梯度乘一个 2^N 的系数,称为 scale factor,把梯度 shift 到 FP16 的表示范围。  GradScaler的工作就是在反向传播前给 loss 乘一个 scale factor,所以之后反向传播得到的梯度都乘了相同的 scale factor。并且为了不影响学习率,在梯度更新前将梯度unscale。总结amp的基本训练流程: 维护一个 FP32 数值精度模型的副本在每个iteration拷贝并且转换成 FP16 模型 前向传播(FP16 的模型参数)loss 乘 scale factor s反向传播(FP16 的模型参数和参数梯度)参数梯度乘 1/s利用 FP16 的梯度更新 FP32 的模型参数但是,这里会有一个问题,scale factor 应该如何选取?选一个常量显然是不合适的,因为 loss 和梯度的数值在变,scale factor 需要跟随 loss 动态变化。健康的 loss 是振荡中下降,因此GradScaler设计的 scale factor 每隔 N 个 iteration 乘一个大于 1 的系数,再 scale loss;并且每次更新前检查溢出问题(检查梯度中有没有inf和nan),如果有,scale factor 乘一个小于 1 的系数并跳过该 iteration 的参数更新环节,如果没有,就正常更新参数。动态更新 scale factor 是 amp 实际操作中的流程。总结 amp 动态 scale factor 的训练流程: 维护一个 FP32 数值精度模型的副本初始化 s 在每个 iteration + a 拷贝并且转换成FP16模型 + b 前向传播(FP16 的模型参数) + c loss 乘 scale factor s + d 反向传播(FP16 的模型参数和参数梯度) + e 检查有没有inf或者nan的参数梯度 + 如果有:降低 s,回到步骤a + f 参数梯度乘 1/s + g 利用 FP16 的梯度更新 FP32 的模型参数2. amp模块的API用户使用混合精度训练基本操作: # amp依赖Tensor core架构,所以model参数必须是cuda tensor类型 model = Net().cuda() optimizer = optim.SGD(model.parameters(), ...) # GradScaler对象用来自动做梯度缩放 scaler = GradScaler() for epoch in epochs: for input, target in data: optimizer.zero_grad() # 在autocast enable 区域运行forward with autocast(): # model做一个FP16的副本,forward output = model(input) loss = loss_fn(output, target) # 用scaler,scale loss(FP16),backward得到scaled的梯度(FP16) scaler.scale(loss).backward() # scaler 更新参数,会先自动unscale梯度 # 如果有nan或inf,自动跳过 scaler.step(optimizer) # scaler factor更新 scaler.update()2.1 autocast类``autocast(enable=True)`` 可以作为上下文管理器和装饰器来使用,给算子自动安排按照 FP16 或者 FP32 的数值精度来操作。 2.1.1 autocast算子PyTorch中,只有 CUDA 算子有资格被 autocast,而且只有 “out-of-place” 才可以被 autocast,例如:a.addmm(b, c)是可以被 autocast,但是a.addmm_(b, c)和a.addmm(b, c, out=d)不可以 autocast。amp autocast 成 FP16 的算子有:  autocast 成 FP32 的算子:  剩下没有列出的算子,像dot,add,cat...都是按数据中较大的数值精度,进行操作,即有 FP32 参与计算,就按 FP32,全是 FP16 参与计算,就是 FP16。 2.1.2 MisMatch error作为上下文管理器使用时,混合精度计算 enable 区域得到的 FP16 数值精度的变量在 enable 区域外需要显式的转成 FP32: # Creates some tensors in default dtype (here assumed to be float32) a_float32 = torch.rand((8, 8), device="cuda") b_float32 = torch.rand((8, 8), device="cuda") c_float32 = torch.rand((8, 8), device="cuda") d_float32 = torch.rand((8, 8), device="cuda") with autocast(): # torch.mm is on autocast's list of ops that should run in float16. e_float16 = torch.mm(a_float32, b_float32) # Also handles mixed input types f_float16 = torch.mm(d_float32, e_float16) # After exiting autocast, calls f_float16.float() to use with d_float32 g_float32 = torch.mm(d_float32, f_float16.float())2.1.3 autocast 嵌套使用# Creates some tensors in default dtype (here assumed to be float32) a_float32 = torch.rand((8, 8), device="cuda") b_float32 = torch.rand((8, 8), device="cuda") c_float32 = torch.rand((8, 8), device="cuda") d_float32 = torch.rand((8, 8), device="cuda") with autocast(): e_float16 = torch.mm(a_float32, b_float32) with autocast(enabled=False): f_float32 = torch.mm(c_float32, e_float16.float()) g_float16 = torch.mm(d_float32, f_float32)2.1.4 autocast 作为装饰器这种情况一般用于 data parallel 的模型的,autocast 设计为 “thread local” 的,所以只在 main thread 上设 autocast 区域是不 work 的: model = MyModel() dp_model = nn.DataParallel(model) with autocast(): # dp_model's internal threads won't autocast. #The main thread's autocast state has no effect. output = dp_model(input) # loss_fn still autocasts, but it's too late... loss = loss_fn(output)正确姿势是对 forward 装饰: MyModel(nn.Module): ... @autocast() def forward(self, input): ...另一个正确姿势是在 forward 的里面设 autocast 区域: MyModel(nn.Module): ... def forward(self, input): with autocast(): ...forward 函数处理之后,在 main thread 里 autocast model = MyModel() dp_model = nn.DataParallel(model) with autocast(): output = dp_model(input) loss = loss_fn(output)2.1.5 autocast 自定义函数对于用户自定义的 autograd 函数,需要用amp.custom_fwd装饰 forward 函数,amp.custom_bwd装饰 backward 函数: class MyMM(torch.autograd.Function): @staticmethod @custom_fwd def forward(ctx, a, b): ctx.save_for_backward(a, b) return a.mm(b) @staticmethod @custom_bwd def backward(ctx, grad): a, b = ctx.saved_tensors return grad.mm(b.t()), a.t().mm(grad)调用时再 autocast mymm = MyMM.apply with autocast(): output = mymm(input1, input2)2.1.6 源码分析autocast主要实现接口有: A. __enter__ def __enter__(self): self.prev = torch.is_autocast_enabled() torch.set_autocast_enabled(self._enabled) torch.autocast_increment_nesting()B. __exit__ def __exit__(self, *args): if torch.autocast_decrement_nesting() == 0: torch.clear_autocast_cache() torch.set_autocast_enabled(self.prev) return FalseC. __call__ def __call__(self, func): @functools.wraps(func) def decorate_autocast(*args, **kwargs): with self: return func(*args, **kwargs) return decorate_autocast其中torch.*autocast*函数是在 pytorch/aten/src/ATen/autocast_mode.cpp 里实现。PyTorch ATen 是 A TENsor library for C++11,ATen 部分有大量的代码是来声明和定义 Tensor 运算相关的逻辑的。autocast_mode.cpp 实现策略是 “ cache fp16 casts of fp32 model weights”。 2.2 GradScaler 类torch.cuda.amp.GradScaler(init_scale=65536.0, growth_factor=2.0, backoff_factor=0.5, growth_interval=2000, enabled=True)用于动态 scale 梯度 +. init_scale: scale factor 的初始值 +. growth_factor: 每次 scale factor 的增长系数 +. backoff_factor: scale factor 下降系数 +. growth_interval: 每隔多个 interval 增长 scale factor +. enabled: 是否做 scale 2.2.1 scale(output)方法对outputs乘 scale factor,并返回,如果enabled=False就原样返回。 2.2.3 step(optimizer, *args, **kwargs)方法step 方法在做两件事情: 对梯度 unscale,如果之前没有手动调用unscale方法的话检查梯度溢出,如果没有nan/inf,就执行 optimizer 的 step,如果有就跳过注意:GradScaler的step不支持传 closure。 2.2.4 update(new_scale=None)方法update方法在每个 iteration 结束前都需要调用,如果参数更新跳过,会给 scale factor 乘backoff_factor,或者到了该增长的 iteration,就给 scale factor 乘growth_factor。也可以用new_scale直接更新 scale factor。 2.3 举例2.3.1 Gradient clippingscaler = GradScaler() for epoch in epochs: for input, target in data: optimizer.zero_grad() with autocast(): output = model(input) loss = loss_fn(output, target) scaler.scale(loss).backward() # unscale 梯度,可以不影响clip的threshold scaler.unscale_(optimizer) # clip梯度 torch.nn.utils.clip_grad_norm_(model.parameters(), max_norm) # unscale_()已经被显式调用了,scaler正常执行step更新参数,有nan/inf也会跳过 scaler.step(optimizer) scaler.update()2.3.2 Gradient accumulationscaler = GradScaler() for epoch in epochs: for i, (input, target) in enumerate(data): with autocast(): output = model(input) loss = loss_fn(output, target) # loss 根据 累加的次数归一一下 loss = loss / iters_to_accumulate # scale 归一的loss 并backward scaler.scale(loss).backward() if (i + 1) % iters_to_accumulate == 0: # may unscale_ here if desired # (e.g., to allow clipping unscaled gradients) # step() and update() proceed as usual. scaler.step(optimizer) scaler.update() optimizer.zero_grad()2.3.3. Gradient penaltyscaler = GradScaler() for epoch in epochs: for input, target in data: optimizer.zero_grad() with autocast(): output = model(input) loss = loss_fn(output, target) # 防止溢出,在不是autocast 区域,先用scaled loss 得到 scaled 梯度 scaled_grad_params = torch.autograd.grad(outputs=scaler.scale(loss), inputs=model.parameters(), create_graph=True) # 梯度unscale inv_scale = 1./scaler.get_scale() grad_params = [p * inv_scale for p in scaled_grad_params] # 在autocast 区域,loss 加上梯度惩罚项 with autocast(): grad_norm = 0 for grad in grad_params: grad_norm += grad.pow(2).sum() grad_norm = grad_norm.sqrt() loss = loss + grad_norm scaler.scale(loss).backward() # may unscale_ here if desired # (e.g., to allow clipping unscaled gradients) # step() and update() proceed as usual. scaler.step(optimizer) scaler.update()2.3.4. Multiple modelsscaler 一个就够,但 scale(loss) 和 step(optimizer) 要分别执行 scaler = torch.cuda.amp.GradScaler() for epoch in epochs: for input, target in data: optimizer0.zero_grad() optimizer1.zero_grad() with autocast(): output0 = model0(input) output1 = model1(input) loss0 = loss_fn(2 * output0 + 3 * output1, target) loss1 = loss_fn(3 * output0 - 5 * output1, target) # (retain_graph here is unrelated to amp, it's present because in this # example, both backward() calls share some sections of graph.) scaler.scale(loss0).backward(retain_graph=True) scaler.scale(loss1).backward() # You can choose which optimizers receive explicit unscaling, if you # want to inspect or modify the gradients of the params they own. scaler.unscale_(optimizer0) scaler.step(optimizer0) scaler.step(optimizer1) scaler.update()2.3.5. Multiple GPUstorch DDP 和 torch DP model 的处理方式一样 Q1. amp 是如何做到 FP16 和 FP32 混合使用,“还不掉点”模型量化、模型压缩的算法挺多的,但都做不 amp 这样,对多数模型训练不掉点(但是实操中,听有经验的大神介绍,完全不到点还是有点难度的)。amp 能做成这样,因为它对模型没有压缩和量化,维护的还是一个 32 位的模型。只是用 16 位去表示原来 32 位的梯度:通常模型训练依赖 FP32 的精度,因为梯度会有一部分 FP16 表示不了,而 scale factor 把梯度 shift 到 FP16 能表示范围,使得梯度方面精度的损失较小,可能 forward 时候的直接的精度压缩是训练最大的损失。 Q2. 没有 Tensor Core 架构能否使用 amp没有 Tensor Core 架构的 GPU 试用 amp,速度反而下降,但显存会明显减少。作者在 Turing 架构的 GTX 1660 上试用 amp,运算时间增加了一倍,但显存不到原来的一半。 Q3. 为什么 amp 中有两份参数,存储消耗反而更小相比与模型参数,对中间层结果的存储更是 deep learning 的 bottleneck。当对中间结果的存储砍半,整个存储消耗就基本上原来的一半。  参考资料https://docs.nvidia.com/deeplearning/performance/mixed-precision-training/index.html#tensorophttps://pytorch.org/docs/stable/notes/amp_examples.html#amp-exampleshttps://pytorch.org/docs/stable/amp.html?highlight=amp#module-torch.cuda.amphttps://pytorch.org/tutorials/recipes/recipes/amp_recipe.html"NVIDIA TESLA V100 GPU ARCHITECTURE" white paperhttps://nvlabs.github.io/eccv2020-mixed-precision-tutorial/Micikevicius, Paulius, Sharan Narang, Jonah Alben, Gregory Diamos, Erich Elsen, David Garcia, Boris Ginsburg, et al. “Mixed Precision Training.” ArXiv:1710.03740 [Cs, Stat], February 15, 2018. http://arxiv.org/abs/1710.03740.“Training with Mixed Precision,” n.d., 46."Training Neural Network with Mixed Precision", Nvidia GTC Talk.https://zhuanlan.zhihu.com/p/55966063https://mli.github.io/2016/06/14/new-pascal/ 参考资料https://docs.nvidia.com/deeplearning/performance/mixed-precision-training/index.html#tensorophttps://pytorch.org/docs/stable/notes/amp_examples.html#amp-exampleshttps://pytorch.org/docs/stable/amp.html?highlight=amp#module-torch.cuda.amphttps://pytorch.org/tutorials/recipes/recipes/amp_recipe.html"NVIDIA TESLA V100 GPU ARCHITECTURE" white paperhttps://nvlabs.github.io/eccv2020-mixed-precision-tutorial/Micikevicius, Paulius, Sharan Narang, Jonah Alben, Gregory Diamos, Erich Elsen, David Garcia, Boris Ginsburg, et al. “Mixed Precision Training.” ArXiv:1710.03740 [Cs, Stat], February 15, 2018. http://arxiv.org/abs/1710.03740.“Training with Mixed Precision,” n.d., 46."Training Neural Network with Mixed Precision", Nvidia GTC Talk.https://zhuanlan.zhihu.com/p/55966063https://mli.github.io/2016/06/14/new-pascal/ 快速链接: OpenMMLab:PyTorch 源码解读系列 OpenMMLab:PyTorch 源码解读之 torch.autograd:梯度计算详解 OpenMMLab:PyTorch 源码解读之 BN & SyncBN:BN 与 多卡同步 BN 详解 OpenMMLab:PyTorch 源码解读之 torch.utils.data:解析数据处理全流程 OpenMMLab:PyTorch 源码解读之 nn.Module:核心网络模块接口详解 OpenMMLab:PyTorch 源码解读之 DP & DDP:模型并行和分布式训练解析 OpenMMLab:PyTorch 源码解读之 torch.optim:优化算法接口详解 OpenMMLab:PyTorch 源码解读之 torch.cuda.amp: 自动混合精度详解 OpenMMLab:PyTorch 源码解读之 cpp_extension:揭秘 C++/CUDA 算子实现和调用全流程 |
【本文地址】